
If you’re in the mood for a dessert that’s quick, easy, and absolutely delicious, look no further than this No Bake Oreo Dessert. Perfect for those moments when you want a rich, creamy, and indulgent treat without the hassle of turning on the oven, this dessert combines layers of crushed Oreos, a smooth cream cheese filling, and a delightful whipped topping. It’s a crowd-pleaser for any occasion, whether you’re serving it at a party, family gathering, or just enjoying it as a sweet after-dinner treat.
The best part about this dessert is how easy it is to make. With just a few ingredients and minimal prep time, you can whip up this creamy, dreamy dessert in no time. It’s the perfect combination of crunchy, sweet, and creamy, with the classic flavor of Oreos taking center stage. No bake desserts like this one are a great option for busy days when you want something sweet but don’t want to spend hours in the kitchen.
Why You’ll Love This Recipe
1. No Baking Required
This dessert comes together without the need for an oven, making it a perfect option for hot summer days or when you’re short on time.
2. Easy to Make
With just a few simple ingredients, this recipe is quick and easy, even for beginners or those looking for a last-minute dessert.
3. Irresistible Oreo Flavor
The combination of crushed Oreos and creamy filling creates a dessert that’s packed with that iconic Oreo flavor everyone loves.
4. Creamy & Crunchy Texture
The layers of creamy filling and crunchy Oreos give the dessert a perfect balance of textures, making every bite satisfying.
5. Perfect for Any Occasion
Whether you’re serving it at a party, family gathering, or holiday event, this No Bake Oreo Dessert is sure to impress and delight your guests.

Ingredients
- Oreo cookies (regular or double stuff)
- Cream cheese
- Powdered sugar
- Vanilla extract
- Heavy whipping cream
- Butter
Variations
- Flavor Twist: Add a spoonful of peanut butter or Nutella to the cream cheese filling for a new flavor.
- Crust Options: Use different cookies like chocolate wafer cookies or graham crackers to create your crust.
- Toppings: Top with mini chocolate chips, sprinkles, or even a drizzle of chocolate or caramel sauce for extra flair.
How to Make the Recipe
Step 1: Prepare the Oreo Crust
Crush the Oreo cookies into fine crumbs using a food processor or by placing them in a plastic bag and smashing them with a rolling pin. Melt the butter and mix it into the Oreo crumbs until well combined. Press the mixture into the bottom of a 9×9-inch baking dish to form a crust.
Step 2: Make the Cream Cheese Filling
In a bowl, beat the cream cheese until smooth. Add powdered sugar and vanilla extract, mixing until fully combined and smooth.
Step 3: Whip the Cream
In a separate bowl, whip the heavy cream until stiff peaks form. Gently fold the whipped cream into the cream cheese mixture until well combined.
Step 4: Layer the Dessert
Spread the cream cheese mixture evenly over the Oreo crust, smoothing the top with a spatula. If desired, crumble a few more Oreos on top for extra texture.
Step 5: Chill
Cover the dessert and refrigerate for at least 4 hours, or overnight, to allow the flavors to meld and the dessert to set.
Step 6: Serve
Once chilled, slice and serve the dessert. You can garnish with extra whipped cream, Oreo crumbles, or chocolate drizzle for a finishing touch.
Tips for Making the Recipe
- Make sure the cream cheese is softened before mixing it with the powdered sugar to avoid lumps.
- For a firmer dessert, let it chill overnight. This will help the layers set and allow the flavors to blend together.
- Be gentle when folding the whipped cream into the cream cheese mixture to maintain the fluffy texture.
- If you want a thicker crust, use more Oreos and butter for the base.

How to Serve
Serve this No Bake Oreo Dessert chilled for the best texture and flavor. It pairs well with a cup of coffee or a cold glass of milk. For added presentation, top with extra crumbled Oreos, whipped cream, or a drizzle of chocolate syrup to elevate the dessert.
Make Ahead and Storage
Storing Leftovers
Store any leftover dessert in an airtight container in the refrigerator for up to 4 days. The dessert stays fresh and delicious when properly stored.
Freezing
While this dessert is best enjoyed fresh, you can freeze it for up to 2 months. Make sure to cover it tightly with plastic wrap and aluminum foil. Thaw in the refrigerator overnight before serving.
Reheating
There’s no need to reheat this dessert. It’s meant to be served cold for the best texture and flavor.
FAQs
1. Can I use other cookies instead of Oreos?
Yes, you can use chocolate wafer cookies, graham crackers, or any other cookies you enjoy for the crust.
2. Can I make this dessert without whipped cream?
While the whipped cream adds lightness and texture, you can substitute it with extra cream cheese or use a store-bought whipped topping.
3. How long should I let it chill?
For the best results, chill the dessert for at least 4 hours, or overnight, to allow the layers to set properly.
4. Can I make this dessert gluten-free?
Yes, use gluten-free Oreos or any gluten-free cookie for the crust, and the rest of the ingredients should be naturally gluten-free.
5. How can I make the dessert more indulgent?
Add a layer of chocolate ganache, caramel, or a drizzle of peanut butter on top for an extra rich treat.
6. Can I use regular sugar instead of powdered sugar?
For the smoothest filling, powdered sugar is recommended, but you can use regular granulated sugar if necessary; just be sure to beat the mixture well to avoid grittiness.
7. Can I make individual servings?
Yes, you can divide the dessert into individual servings by layering it in small mason jars or cups.
8. Is it okay to use a store-bought whipped topping?
Yes, if you want to save time, a store-bought whipped topping like Cool Whip can be used in place of homemade whipped cream.
9. How can I make the crust firmer?
Use more crushed Oreos or reduce the amount of butter slightly if you want a firmer, more stable crust.
10. Can I freeze this dessert?
Yes, you can freeze this dessert, but it’s best enjoyed fresh. If you do freeze it, be sure to thaw it completely before serving.

Conclusion
This No Bake Oreo Dessert is the ultimate easy, creamy, and indulgent treat for any occasion. With minimal effort and just a few ingredients, you can create a dessert that’s sure to satisfy any sweet tooth. Whether you’re hosting a party, treating your family, or just looking for a sweet snack, this dessert is a guaranteed winner.
Print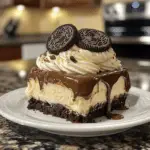
No Bake Oreo Dessert
- Total Time: 4+ hours (includes chilling time)
- Yield: 12–16 servings 1x
- Diet: Vegetarian
Description
This No Bake Oreo Dessert is the ultimate indulgence for Oreo lovers! With layers of creamy cheesecake filling, crumbled Oreo cookies, and a rich chocolate topping, this dessert requires no baking—just chilling time. It’s a quick and easy treat that’s perfect for any occasion, and it’s sure to satisfy your sweet tooth!
Ingredients
For the crust:
- 24 Oreo cookies (crushed)
- 1/4 cup unsalted butter (melted)
For the filling:
- 8 oz cream cheese (softened)
- 1/2 cup powdered sugar
- 1 tsp vanilla extract
- 1 1/2 cups whipped cream (or heavy whipping cream, whipped)
- 1 cup Oreo cookies (crushed, for filling)
For the topping:
- 8–10 Oreo cookies (whole or roughly chopped, for topping)
- Optional: Chocolate syrup or ganache for drizzling
Instructions
- Make the crust:
- In a bowl, combine the crushed Oreos and melted butter. Stir until the mixture resembles wet sand.
- Press the mixture into the bottom of a 9×9-inch baking dish or pie dish to form a crust. Use the back of a spoon to pack it down tightly.
- Refrigerate the crust for at least 15 minutes while you prepare the filling.
- Prepare the filling:
- In a large bowl, beat the cream cheese, powdered sugar, and vanilla extract until smooth and creamy.
- Gently fold in the whipped cream until fully incorporated.
- Stir in the crushed Oreo cookies until evenly distributed throughout the filling.
- Assemble the dessert:
- Spread the filling evenly over the chilled Oreo crust.
- Top with whole or chopped Oreo cookies and drizzle with chocolate syrup or ganache if desired.
- Chill:
- Refrigerate the dessert for at least 4 hours or overnight to allow it to set properly.
- Serve:
- Slice into squares and enjoy!
Notes
- Make sure to let the dessert chill for a few hours to ensure it sets properly and holds its shape when serving.
- You can add a bit more whipped cream to the filling if you prefer a fluffier texture.
- Optional: For extra indulgence, drizzle with melted chocolate ganache or top with mini chocolate chips.
- Prep Time: 15 minutes (not including chill time)
- Cook Time: None (no baking required)
- Category: Dessert
- Method: No-bake
- Cuisine: American
Keywords: No bake dessert, Oreo dessert, cheesecake dessert, easy dessert, Oreo no-bake, creamy dessert, Oreo lovers, chilled dessert