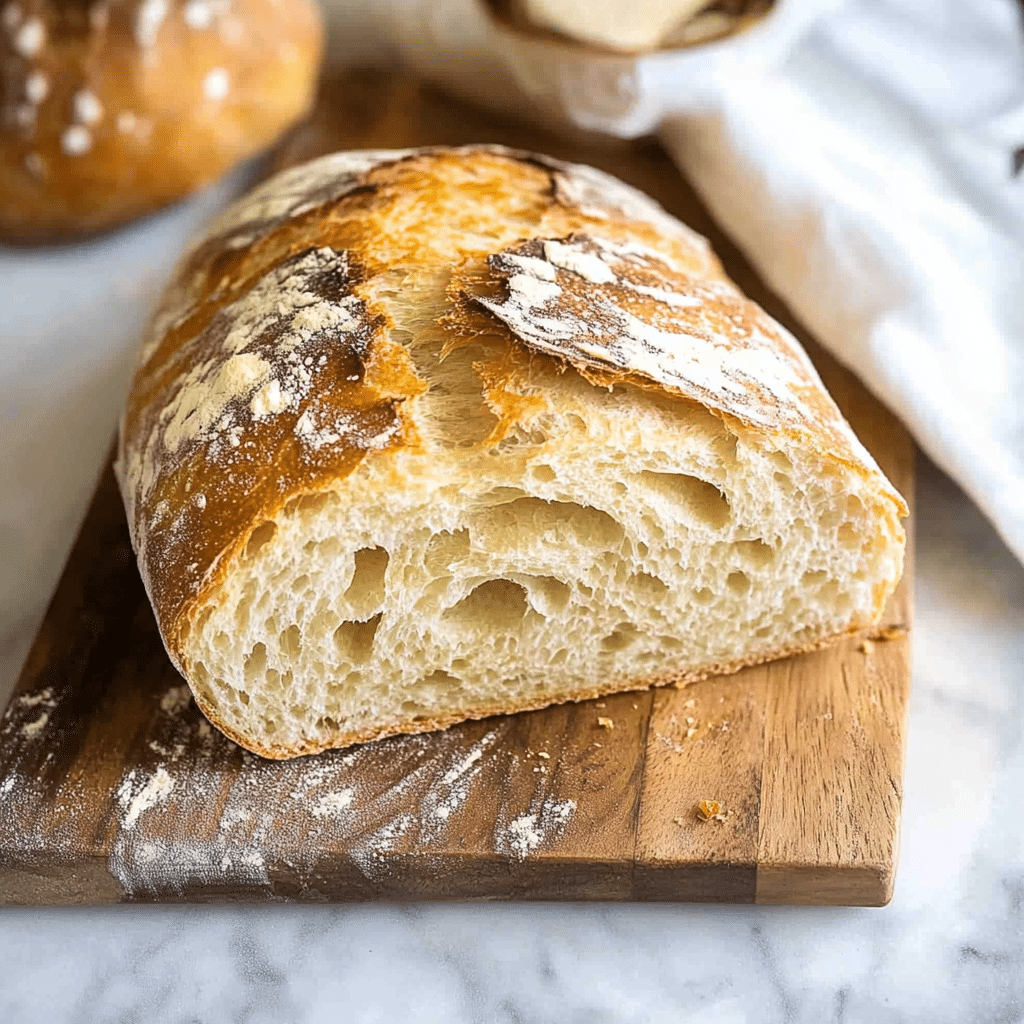
Freshly baked artisan bread with a crispy, golden crust and soft, airy interior is a real treat. And the best part? You don’t need any fancy equipment or hours of kneading. This Best No Knead Artisan Bread Recipe is simple, straightforward, and delivers bakery-quality results right in your own kitchen. With just a few basic ingredients and minimal effort, you’ll have a stunning loaf of bread that will impress anyone who tries it.
Why You’ll Love This Recipe
1. No Kneading Required
Unlike traditional bread recipes that require kneading and time-consuming steps, this recipe is super easy with no kneading required. The dough comes together effortlessly and requires minimal hands-on time.
2. Simple Ingredients
This recipe uses only four basic ingredients—flour, salt, yeast, and water—making it simple to prepare without any complicated or hard-to-find ingredients.
3. Incredible Flavor
The slow rise develops the flavor of the dough, resulting in a bread that has deep, rich taste and a soft crumb with a slightly tangy flavor, making it perfect for sandwiches, dipping, or enjoying on its own.
4. Perfect Crust
The bread comes out of the oven with a beautiful, crispy, golden-brown crust that will have you coming back for more. It’s the perfect balance between crunchy on the outside and soft on the inside.
5. Minimal Effort
Once the dough is mixed, the recipe essentially takes care of itself. It’s a perfect recipe for busy people who want to enjoy homemade bread without spending hours in the kitchen.

Ingredients
- 3 cups all-purpose flour
- 2 teaspoons coarse sea salt
- 1/2 teaspoon active dry yeast (or instant yeast)
- 1 ½ cups warm water (about 110 degrees F)
Variations
- Add-ins: Feel free to add flavorings like rosemary, garlic, olives, or even cheese to your dough for a twist on the classic.
- Whole Wheat Version: For a healthier alternative, you can substitute some or all of the all-purpose flour with whole wheat flour.
- Herb Infused: Add dried herbs like thyme, oregano, or basil to the dough for a more aromatic bread.
- Gluten-Free: If you need a gluten-free option, you can use a gluten-free all-purpose flour blend.
How to Make the Recipe
Step 1: Mix the Dough
In a large mixing bowl, combine the flour, sea salt, and yeast. Pour in the warm water and mix using a wooden spoon or your hands until a shaggy dough forms. The dough will be sticky, but that’s normal.
Step 2: Let the Dough Rise
Cover the bowl with a clean kitchen towel or plastic wrap and let it sit in a warm place for 12-18 hours. The dough should double in size and become bubbly.
Step 3: Preheat the Oven
Once the dough has risen, preheat your oven to 450°F (230°C). Place a Dutch oven or heavy pot with a lid inside the oven to preheat as well. This will help create the steam needed for that perfect crust.
Step 4: Shape the Dough
Turn the dough out onto a lightly floured surface and gently shape it into a round loaf. Don’t worry about it being perfect—rustic is the goal!
Step 5: Bake the Bread
Once the pot is preheated, carefully remove it from the oven and place the dough inside. Cover the pot with its lid and bake for 30 minutes. After 30 minutes, remove the lid and bake for an additional 15-20 minutes, or until the bread is golden brown and has a hollow sound when tapped on the bottom.
Step 6: Cool and Serve
Let the bread cool on a wire rack before slicing. This will allow the crumb to set properly and prevent it from becoming too soggy.
Tips for Making the Recipe
- Don’t rush the rise: The long rise time is key to developing the flavor and texture of the bread. Don’t try to speed up the process, as this can affect the bread’s quality.
- Use warm water: Make sure the water is warm, but not too hot, as it can kill the yeast. The temperature should be around 110°F (43°C).
- Steam is key: The steam created by baking the bread in a covered pot helps achieve that perfect crust. If you don’t have a Dutch oven, you can use a covered casserole dish or create steam in the oven by placing a pan of water at the bottom.
- Let the bread cool: It may be tempting to slice right into the bread, but allowing it to cool before slicing helps the texture set and prevents it from being too doughy.

How to Serve
Serve this delicious artisan bread with a smear of butter, homemade jam, or your favorite spreads. It’s also great alongside soups, salads, or as a base for sandwiches. The options are endless, and this bread can complement any meal.
Make Ahead and Storage
Storing Leftovers
Once fully cooled, store the bread in a paper bag or breadbox at room temperature for up to 3 days. If you want to store it for longer, you can freeze the bread for up to 3 months. To reheat, simply place it in the oven for a few minutes to restore its crust.
Freezing
To freeze, let the bread cool completely, then slice it and wrap the slices tightly in plastic wrap or foil. Place the wrapped bread in a freezer-safe bag. Thaw slices as needed by reheating them in the oven.
Reheating
To reheat frozen bread, place the slices in a preheated oven at 350°F (175°C) for about 10 minutes, or until warmed through.
FAQs
1. Can I use bread flour instead of all-purpose flour?
Yes, bread flour can be used for a chewier texture and slightly higher gluten content.
2. Can I make this bread without a Dutch oven?
Yes, if you don’t have a Dutch oven, you can use any heavy oven-safe pot with a lid, or you can bake it on a baking sheet, but the crust may not be as thick.
3. How do I know when the bread is done?
The bread is done when the crust is golden brown and sounds hollow when tapped on the bottom. You can also use a thermometer to check that the internal temperature has reached about 200°F (93°C).
4. Can I add herbs to this recipe?
Yes! Feel free to add dried herbs or spices to the dough to customize the flavor.
5. Can I make this bread without yeast?
No-knead bread requires yeast for the leavening, so it’s not possible to make it without yeast.
6. How do I get the best crust?
The key to a good crust is baking with steam. The covered pot traps steam and helps create a crispy, golden exterior.
7. Can I halve the recipe to make a smaller loaf?
Yes, you can halve the recipe, but you’ll need to reduce the rising time slightly depending on the size of the loaf.
8. Can I make this bread in a bread machine?
This recipe is meant to be made by hand, but you can try it in a bread machine by using the dough cycle, though it may affect the texture.
9. Can I make this bread with whole wheat flour?
Yes, you can replace some or all of the all-purpose flour with whole wheat flour. The texture will be denser, but it will still be delicious.
10. Can I use instant yeast instead of active dry yeast?
Yes, instant yeast works perfectly fine in this recipe. You can add it directly to the flour without proofing.

Conclusion
Best No Knead Artisan Bread is the perfect recipe for anyone who loves fresh, homemade bread but doesn’t want to spend hours in the kitchen. With minimal ingredients, little hands-on time, and an incredible result, this bread is sure to become a staple in your home. Enjoy the rustic, crispy crust and soft, flavorful crumb—every bite is worth the wait.
Print
Best No Knead Artisan Bread Recipe
- Total Time: 12-18 hours (including rise time)
- Yield: 1 loaf 1x
- Diet: Vegetarian
Description
This No Knead Artisan Bread is the perfect blend of simplicity and flavor. With just a few basic ingredients, you can create a beautifully crusty, soft, and airy loaf with minimal effort. No kneading, no special equipment, just a bit of time and patience for a homemade bread that rivals anything you can buy at a bakery.
Ingredients
- 3 cups all-purpose flour
- 2 teaspoons coarse sea salt
- 1/2 teaspoon active dry yeast (or instant yeast)
- 1 ½ cups warm water (about 110°F)
Instructions
-
Mix the Dough:
In a large bowl, combine the flour, sea salt, and yeast. Add the warm water and stir with a wooden spoon or spatula until the dough begins to come together. The dough should be wet and sticky, but not too runny. Cover the bowl with plastic wrap or a damp kitchen towel. -
Let the Dough Rise:
Allow the dough to rise at room temperature for 12-18 hours. The dough should double in size, and you will see bubbles forming throughout. If it doesn’t rise this much, don’t worry; it’s still fine! -
Shape the Dough:
After the dough has risen, transfer it to a well-floured surface. Gently fold the dough over itself a few times, just to form a rough ball. Don’t worry about making it perfect—this is a rustic loaf! -
Preheat the Oven and Pot:
About 30 minutes before baking, preheat your oven to 450°F (230°C). Place a Dutch oven or a heavy, oven-safe pot with a lid inside the oven while it heats up. This will help create the perfect steam environment for the bread. -
Bake the Bread:
Once the oven has preheated, carefully remove the hot pot from the oven. Place the dough inside, cover with the lid, and return it to the oven. Bake for 30 minutes with the lid on. -
Finish Baking:
After 30 minutes, remove the lid and continue baking for an additional 15-20 minutes, or until the bread is golden brown and sounds hollow when tapped on the bottom. -
Cool and Serve:
Allow the bread to cool on a wire rack for at least 30 minutes before slicing. Enjoy the crusty exterior and soft, airy interior with butter, jam, or as a side to your favorite soup or salad.
Notes
- You can substitute the all-purpose flour with bread flour for a slightly different texture.
- If you prefer a tangier flavor, you can let the dough rise for up to 24 hours.
- For an extra crispy crust, you can add steam by placing a small pan of water in the bottom of the oven while baking.
- Prep Time: 10 minutes (plus 12-18 hours rise time)
- Cook Time: 45-50 minutes
- Category: Bread
- Method: No-Knead
- Cuisine: American
Keywords: No Knead Bread, Artisan Bread, Homemade Bread, Easy Bread Recipe, Rustic Bread, Baking, Simple Bread Recipe