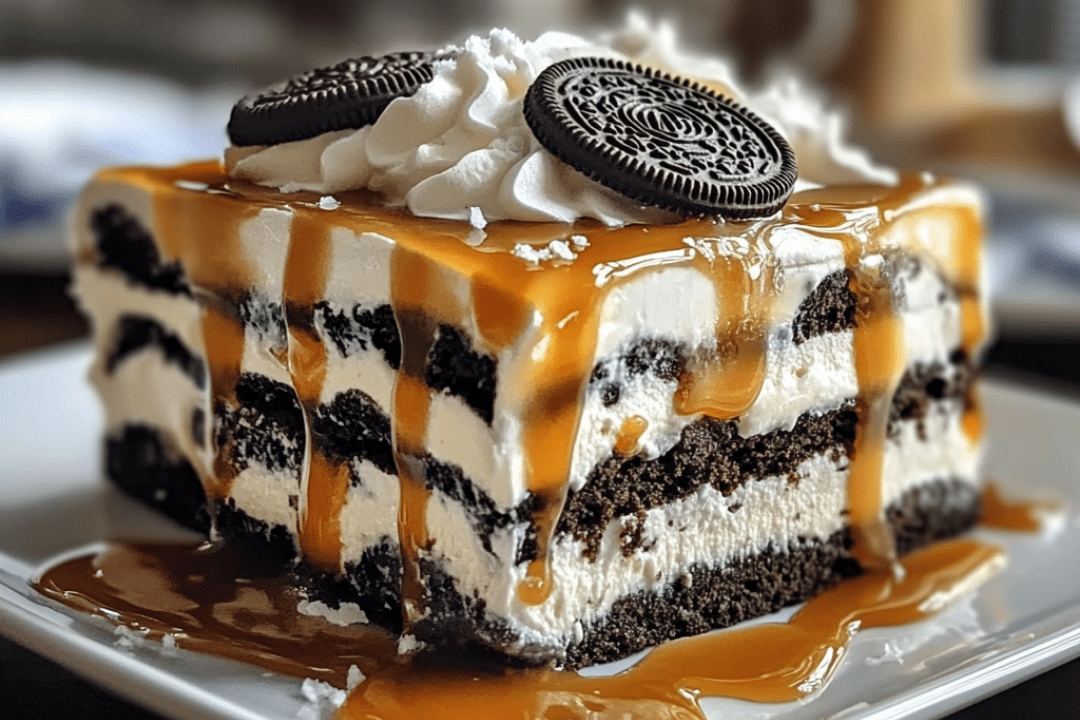
If you’re looking for a no-bake dessert that’s as simple as it is decadent, the Caramel Oreo Icebox Cake is the perfect treat to add to your dessert repertoire. This dessert combines the rich and creamy flavors of whipped cream and caramel with the satisfying crunch of Oreo cookies, creating a heavenly balance of textures and tastes. What makes this cake even more irresistible is its simplicity—just a few ingredients and minimal prep time are all it takes to create a dessert that will impress any crowd. Refrigerated for a few hours, this cake transforms into a deliciously creamy treat that’s perfect for any occasion.
Whether you’re hosting a dinner party, enjoying a cozy family gathering, or just indulging in a sweet treat for yourself, this Caramel Oreo Icebox Cake is a crowd-pleaser. With no baking involved, it’s easy to prepare ahead of time, making it a great option for busy schedules or last-minute gatherings. The combination of chocolatey Oreos, rich caramel, and light whipped cream creates a dessert that will have everyone coming back for seconds.
Why You’ll Love This Recipe
- No-Bake Delight: This dessert doesn’t require any baking, making it a perfect choice for hot days or busy cooks.
- Simple Ingredients: With just three main ingredients—Oreo cookies, caramel sauce, and whipped cream—it’s a breeze to make.
- Quick Preparation: Ready in just 15 minutes of prep time, the hardest part is waiting for it to chill.
- Perfect for Any Occasion: Whether it’s a holiday, party, or casual family dinner, this cake suits all types of gatherings.
- Decadent Yet Light: The blend of crunchy, creamy, and sweet flavors creates a delicious contrast that’s both indulgent and satisfying without being overwhelming.
Ingredients
- Oreo cookies
- Caramel sauce
- Whipped cream
Variations
- Chocolate Drizzle: For an extra indulgent twist, drizzle chocolate syrup over the top after assembling the layers.
- Add Nuts: Sprinkle crushed nuts like pecans or almonds between the layers for added crunch.
- Different Cookie Bases: Swap the Oreos for other cookies like graham crackers or chocolate chip cookies for a unique flavor.
- Flavored Whipped Cream: Add a splash of vanilla extract or even a bit of caramel flavor to the whipped cream for an enhanced flavor profile.
- Fruit Layering: Add layers of sliced bananas or strawberries for a fruity contrast to the rich caramel.
How to Make the Recipe
Step 1: Crush the Oreos
Place the Oreo cookies in a Ziploc bag and crush them using a rolling pin or your hands until they are in fine pieces, with a mix of crumbs and small chunks.
Step 2: Layer the Crushed Oreos
In the bottom of a baking dish or serving dish, create an even layer of the crushed Oreo cookies. Make sure the entire bottom is covered.
Step 3: Drizzle Caramel Sauce
Generously drizzle caramel sauce over the layer of crushed Oreos. You want enough caramel to coat the crumbs lightly.
Step 4: Add Whipped Cream
Spread a thick layer of whipped cream over the caramel. Ensure it covers the entire surface evenly.
Step 5: Repeat the Layers
Repeat the process of layering crushed Oreos, caramel sauce, and whipped cream until you’ve used all of your ingredients or the dish is filled to your liking.
Step 6: Refrigerate
Cover the dish with plastic wrap or a lid and refrigerate for at least 4 hours. This allows the flavors to meld and the dessert to firm up, creating a sliceable cake.
Tips for Making the Recipe
- Use Fresh Whipped Cream: If you’re using store-bought whipped cream, consider adding a little vanilla extract or powdered sugar to make it even fluffier and more flavorful.
- Chill Long Enough: Be patient and let the cake refrigerate for at least 4 hours, but overnight works even better for enhanced flavor and texture.
- Crush Oreos Well: Crushing the Oreos into smaller pieces ensures that they soften well when refrigerated and creates a smoother texture in each bite.
- Don’t Skip the Caramel: The caramel sauce adds a rich, sweet layer of flavor that contrasts beautifully with the Oreos and whipped cream.
- Serve Chilled: This dessert is best served cold, making it a perfect summer treat.
How to Serve
This Caramel Oreo Icebox Cake can be served directly from the fridge. Slice it into squares or scoop it into individual portions for a fun and easy presentation. Garnish with a drizzle of extra caramel or a sprinkle of crushed Oreos for a finishing touch. For a more elegant presentation, top each serving with a dollop of whipped cream or a few fresh berries.
Make Ahead and Storage
Storing Leftovers
Store any leftover Caramel Oreo Icebox Cake in the refrigerator, covered tightly with plastic wrap or in an airtight container. It will stay fresh for up to 2-3 days.
Freezing
While the cake is best enjoyed fresh, it can be frozen for up to 1 month. To freeze, wrap it tightly in plastic wrap and aluminum foil. When ready to eat, let it thaw in the refrigerator for several hours before serving.
Reheating
Since this is a no-bake cake, there’s no need to reheat it. It’s served chilled straight from the fridge.
FAQs
1. Can I use a different type of cookie for this cake?
Yes, you can use other cookies like graham crackers or chocolate chip cookies for a different flavor profile.
2. Can I make this cake ahead of time?
Yes, you can make this cake up to a day ahead of time. Just be sure to refrigerate it for at least 4 hours before serving.
3. Is this dessert gluten-free?
No, this recipe uses regular Oreos, which contain gluten. You can substitute gluten-free Oreos to make it gluten-free.
4. Can I use homemade whipped cream?
Yes! Homemade whipped cream will give the cake a richer, fresher taste.
5. How do I store leftovers?
Store leftovers in the fridge in an airtight container or covered tightly with plastic wrap for up to 2-3 days.
6. Can I add other toppings?
Absolutely! Consider adding chocolate syrup, crushed nuts, or fresh fruit for extra flavor and texture.
7. How long does it take for the cake to set?
The cake should set in the fridge for at least 4 hours, but overnight is best for optimal texture.
8. Can I use caramel topping instead of sauce?
Yes, caramel topping works as well, though caramel sauce typically provides a smoother, thicker layer.
9. How do I make the layers more defined?
Ensure each layer of whipped cream is spread evenly to create clean, defined layers.
10. Can I freeze this dessert?
Yes, you can freeze the cake for up to 1 month. Just thaw in the fridge before serving.
Conclusion
This Caramel Oreo Icebox Cake is a sweet, indulgent dessert that’s perfect for any occasion. With its rich layers of creamy whipped cream, gooey caramel, and crunchy Oreos, it’s sure to be a hit at any gathering. Whether you’re celebrating the holidays, hosting a party, or simply looking for a delicious treat, this no-bake cake is sure to satisfy your sweet tooth. With minimal prep and maximum flavor, it’s a dessert you’ll make again and again.
Print
Caramel Oreo Icebox Cake
- Total Time: 4 hours
- Yield: 8 servings
Description
This Caramel Oreo Icebox Cake is a decadent, no-bake dessert that’s perfect for any occasion. Layers of crushed Oreos, rich caramel sauce, and fluffy whipped cream come together in a chilled dessert that’s both easy to make and incredibly delicious. With minimal ingredients and no baking required, it’s a crowd-pleaser that’s sure to satisfy your sweet tooth.
Ingredients
- Oreo cookies
- Caramel sauce
- Whipped cream
Instructions
- Crush the Oreo cookies in a Ziploc bag until they are fine crumbs.
- Layer the crushed Oreos in the bottom of a dish.
- Drizzle the caramel sauce evenly over the Oreos.
- Spread a generous layer of whipped cream over the caramel.
- Repeat the layers of Oreos, caramel, and whipped cream until the dish is full.
- Refrigerate the cake for at least 4 hours before serving to allow it to set.
Notes
- You can adjust the amount of caramel sauce based on your preference for sweetness.
- For an extra touch, sprinkle some extra crushed Oreos or even chopped nuts on top of the whipped cream layer.
- Make sure to refrigerate the cake for the full 4 hours for the best texture and flavor.
- Prep Time: 15 minutes
- Cook Time: 0 minutes